
Content
- 1 What is Facebook Pixel?
- 2 Facebook Pixel Features
- 3 How to Create a Facebook Pixel?
- 4 How to Install a Facebook Pixel on a Site?
- 5 How to use Facebook Pixels?
- 5.1 How to track Facebook Pixel conversions?
- 5.2 How to optimize the conversion of Facebook ads?
- 5.3 How to set a Cost per Conversion tracking?
- 5.4 How to set up a Facebook Pixel using Google Tag Manager?
- 5.5 Where can you find parameters in Ads Manager?
- 5.6 How to set up sharing parameters via Google Tag Manager
- 5.7 Creating an event with a parameter in Google Tag Manager
- 5.8 Creating a dynamic parameter for an event
- 6 Adjusting pixel on other sites
- 7 How to Share a Facebook Pixel?
- 8 How to remove pixel Facebook?
- 9 Summary
How to work with Facebook Pixel is a mandatory knowledge base for launching complex social media ad strategies and assess their effectiveness. Parameters are specific data points for an event and allow us to build an audience, track conversions, and optimize ad impressions. In this article, we will examine how to set up a Facebook pixel, how to start working with it, and how to share parameters to events through Google Tag Manager.
What is Facebook Pixel?
Pixel Facebook is a tool that allows you to use website data to measure performance, optimize ad impressions and retargeting. It is a data source for other Facebook products to which you connect, including advertising accounts.
The pixel gives advertisers information about Facebook user’s actions on a website. Based on such data, you can assess how close you are to the chosen objective in the current ad campaign, and make changes to get more efficient.
In order to start using pixel and set up visitors tracking, you don’t need to be a specialist in programming. It is enough to complete the standard installation and configuration process.
Facebook Pixel Features
Pixel is essentially a 1px image. It is placed in the site’s code and registers events that happen – from a web page visit to the entire chains of actions, depending on the rules you set. All data collected in this way can be used in advertising to track conversions, optimize ad delivery and retarget ads.
- Conversion tracking
The data you get lets you evaluate the effectiveness of advertising. You can find out, whether users are doing the necessary actions on the website after viewing or clicking through your Facebook ads. In addition, Pixel’s data also go to Facebook Analytics.
- Facebook Ads Conversion Optimization
When the target actions get registered on the website, Facebook system receives an opportunity to optimize the ad delivery according the action you have selected. The ads will be shown to users who are more likely to perform the required action.
- Create custom audiences or retargeting
Users, who went to the website or performed the target action there, can be collected into segments. Thanks to the segments, you can personalize communication and follow users along the funnel with the relevant offers.
In addition, you can share a pixel, which simplifies the work of the team and is especially important if you work with advertising agencies.
How to Create a Facebook Pixel?
It is easy to find the answer to the question “Where to get the Facebook pixel code?”. You need to create it in an Ads Manager:
- Click the Pixels tab in Events Manager
- Click the Create Pixel button.
- Enter the name of the pixel and specify the site URL
- Choose how you want to set the pixel code
![]()
Facebook Pixel consists of a constant part, which remains the same for all pages of the website, and a piece for a particular event.
![]()
This is a scheme from Facebook, which is most convenient to understand the structure of the code. This is what you’ll have to work with. Let’s take a closer look at each item:
- Website header. The place, where you put the pixel code before the </head>.
- Basic code, the same for all pages of the website. Initially, it contains the standard pixel event ‘PageView’. It collects all page visits by URL. The ‘1234567890‘ fragment is the identification number of your pixel. Please note, it’s not equal to the ad account ID, it has its own unique number.
- Event. The code fragment in the example above, fbq (‘track’, ‘AddToCart’), is the event for adding goods to the cart. You can switch this fragment with a specific event, that you want to track on the website. Such event can be either one the standard kit or your own custom one.
How to Install a Facebook Pixel on a Site?
The code you receive in Ads Manager can already be used to:
- collect the audience by URL of a webpage, and
- track conversions by URL of a webpage.
In order to allow pixel to collect data, you should understand how to set it up on a site. It is important to remember that not all actions performed by the user can be tracked by opening a specific URL. For example, there may be no Thank You page, after a user makes a purchase. Therefore, it’s important to use events.
We recommend adding events, in particular in order to be able to track offline conversions and pixel data in Facebook Analytics. Such options are not available when tracking by URL.
How to set up Facebook pixel events? It is quite simple. The network offers a list of 17 standard events:
- AddPaymentInfo
- AddToCart
- AddToWishlist
- CompleteRegistration
- Contact
- CustomizeProduct
- Donation
- FindLocation
- InitiateCheckout
- Lead
- Purchase
- Schedule
- Search
- StartTrial
- SubmitApplication
- Subscribe
- ViewContent
![]()
If you cannot find the event you need, you can create your own one. Having created a custom event, you should also create a custom conversion to enable tracking and optimization. Standard events are already regarded as conversions and they need no additional registration.
If you set clicking a button as events, for example, clicking on the order button, you need to bind them to the HTML elements of the page. Of course, you can contact the programmer with this, but we recommend using Google Tag Manager. Its use speeds up the process and opens up additional opportunities. For example, you can set up an event to register users, who viewed YouTube video on the website. About how to transfer parameters to Facebook Pixel events through the Google Tag Manager we will discuss in this article a little later.
Pixel Work
The simplest example of using a pixel is when an online store guides a user through a sales funnel to the purchase. It needs three must-have standard events:
ViewContent – for viewing an item,
AddToCart – for adding an item to the cart,
Purchase – for making a purchase.
Users who have completed one of these actions can be divided into segments. Advertisers then can show special ad posts to each segment. You can remind of yourself to those who viewed a product and left the website, or push to the purchase those who left a product in a cart without buying it. Those who’ve made a purchase should be excluded from a general ad campaign. And, of course, you can make look-alike audiences based on them.
Creating Custom Audiences
To create a custom audience you need:
1. Find “Audiences” in the “Advertise” column;
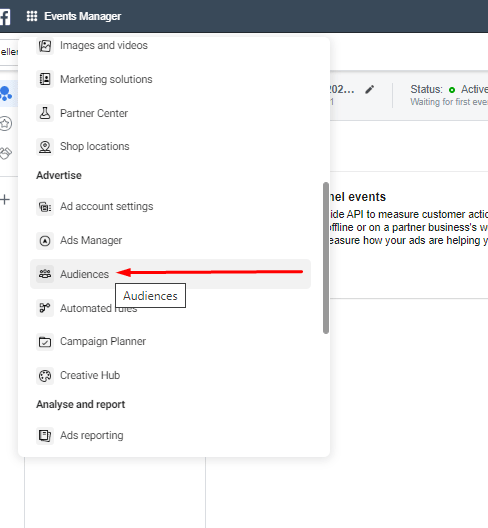
- Click “Create an audience” and select “Custom Audience ”.
- In the new window, click on “Website Traffic”.
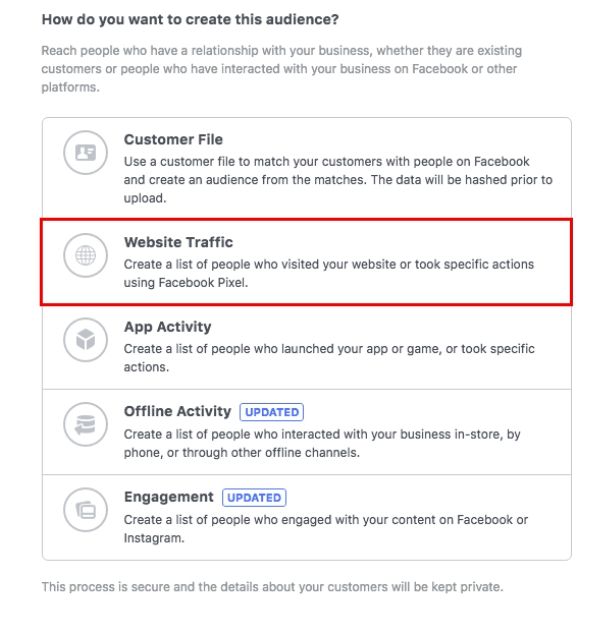
- A window opens with the Audience based on website traffic settings.
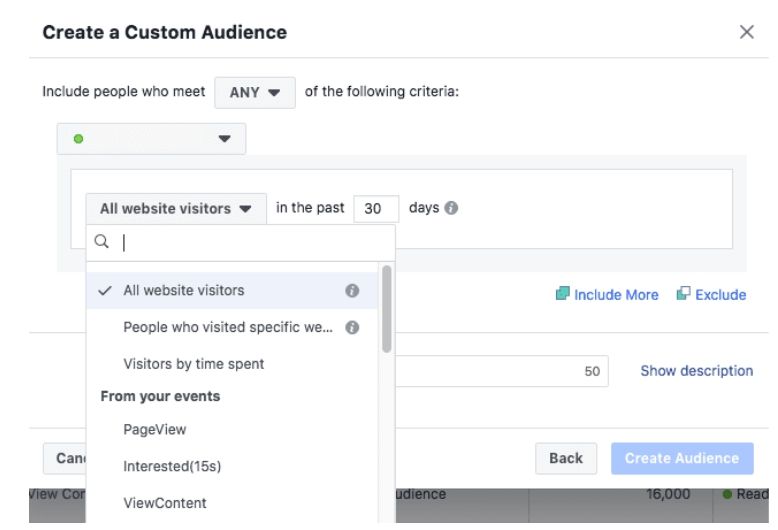
Here we have the following options:
- All website visitors. It allows you to create an audience of people who have been on the site for a period of 1 to 180 days.
- People who visited specific pages. With this option you can collect audiences from the pages you specify.
- Visitors by time spent. It allows you to collect the audience of people who spent on the site on average more time than other visitors.
- Events. This feature provides an opportunity to create an audience of people based on events and parameters.
We are interested in 4 options. When you select the event you need, you can select the parameter you need and enter its value. An absolutely identical process of creating Custom conversions. For clarity, we provide a screenshot below:
![]()
Where is it further implemented in practice?
If you were interested in the question: “how to set up lookalike audience by Pixel”, now you know: by using parameters for events. And among other aspects of their use also:
- retargeting
- ROAS evaluation
- optimization of advertising impressions;
- and many others.
After setting the parameter to collect data for the purchase price, you’ll be able to register a conversion “Purchase for more than $50”.
This provides additional opportunities for retargeting for the current paying audience. In addition, it can create look-alike based on that audiences and optimize your advertising campaigns for those who are more likely to make a purchase over $50.
How to make sure your pixel is active
The first thing you need to do for your pixel to work properly is to simulate its firing, right after you got it installed. That’s the way you activate it.If you are setting up custom events, take the actions yourself. Go along the user’s path and tell the system, which user actions are target actions for the specific web pages. If Facebook Pixel is installed and active, and a conversion event fires, you’ll see the start of the data collection in the Pixels report.
Be sure to install the Pixel Helper extension. It’s available only for Chrome, but it’s a huge helper in understanding how your pixel with its events perform. Pixel Helper will tell you if the event doesn’t work correctly, and the pixel needs further tweaking.
Also, this extension finds all other pixels and shows their IDs. This helps you understand what other tools are connected to the website and receive its data.
![]()
After completing the initial work of installing and configuring the pixel, you can track, for example, what kind of product has been purchased, at what price and what kind of advertising led the user to this. If there are no purchases, you can contact the website visitors again, remind them about yourself or make an attractive offer.
There is another way to test events in an application or browser – the Test Events Tool
In order to test events this way, you need to click on the Test Events tab in your Events Manager. Activity is only recorded while the Test Events web page is kept open. If you need to check the events in the application, you should open it on the phone, and for website events, open your website in a separate window or tab.
Next, you need to start interacting with the site or application to activate event checking. Actions will be displayed in the Test Events tab within 30 seconds, test information will remain in the Test Events tab for 24 hours or until you clear it.
You can select the activity types and details that you want to see. To do this, click on the filter icon and filter by:
- Activity types (Standard events, Custom events, Custom conversions, Automatically logged pixel events and Automatically logged app events);
- Activity Details (URL, Parameters and Active Issues).
If your events don’t appear in the Test Events tool, you can troubleshoot your error messages. Please note that it may take up to 30 minutes before you see data in your analytics.
How to use Facebook Pixels?
As we already mentioned, the pixel serves three main purposes: creating custom audiences, optimizing ad conversions and tracking website conversions. Let’s look at each of them in more detail.
How to track Facebook Pixel conversions?
In order to start tracking conversions, you need to create Custom conversions that allow you to create rules for events or URLs. When you create these rules, you can measure more specific customer actions. Thus, for example, you can filter out all purchases to measure just purchases of men’s ties over a certain cost. Why do you need to add parameters to events? Let’s imagine you sell a wide range of products and you have a goal to increase the average check from $40 to $50 in the near future. How can event parameters help optimize ads in such a way as to attract an audience that is willing to pay? It’s pretty simple. If you pass data using the “value” parameter, you always can create a custom conversion for tracking and optimizing ad impressions for those who spend equal to or more than $50.
It is worth remembering that if the basic part of the pixel code is installed on all pages of the site, then Custom conversions are installed only to the conversion page.
To create Custom conversions, go to Ads Manager – Facebook Pixel – Custom Conversions or follow this link. After clicking on the “Create” button, select the required event from the drop-down list, add the “rule”, select the parameter you need, add the name and description of the conversion (if necessary) and save. Done.
![]()
By the way, the maximum number of Custom conversions in an advertising account is 100. Unnecessary conversions can be deleted by replacing them with a new one, but you can’t use such conversions with dynamic product advertising.
How to optimize the conversion of Facebook ads?
In the process of creating an ad set, you need to select an optimization event (lead, purchase, contact, sending an application, etc.). This will allow Facebook Delivery System to understand what results it should get for you. Next, set Optimization for conversions, and then specify the Conversion window. Thus, you tell the system based on the data for which period you should determine the audience.
How to set a Cost per Conversion tracking?
For standard events, you can set the value and currency, then measure ROAS and set Value Optimization. By default, the value and currency in the standard event code correspond to $ 0, but you can edit this parameter and specify the real value of the conversions.
To change the value and currency of standard events you need to go to the page where the pixel is located and find the snippet of the standard event code.
If the code has a value of “0.00:”, you can replace the value with “0.00” with the actual conversion value. Keep in mind that the decimal value must be equal to or greater than zero, and the presence of letters, commas, special characters, etc. is not allowed.
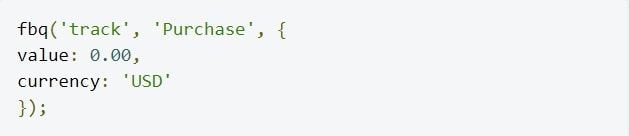
If the code has no value, you need to add a whole code snippet, as shown in the previous step.

In order to change currency, you need to enter its standard 3-letter ISO code according to the ISO 4217 standard.
How to set up a Facebook Pixel using Google Tag Manager?
Facebook Pixel event parameters allow you to detail, track and optimize, therefore they are necessary to get the most out of your purchase data, especially in eCommerce. Either to create a technical task or to set up it manually, it can’t be done without understanding the principles of setting parameters.
Many advertisers face the necessity of sharing extra data to the system for conversions on the site. It is needed for tracking performance and retargeting.
Planning and strategy involve the profitability of advertising costs, the search of a paying audience, the realignment of the budget, and ad optimization. When it comes to manual settings, we need to know how this data can be transmitted to Ads Manager or analytics services.
Where can you find parameters in Ads Manager?
If you install Facebook Pixel manually, you have an opportunity to check code of events and add parameters to them from Facebook’s suggestions. You can find the full list of all parameters which are available for standard events on Facebook for developers.
![]()
Each of the events has all the required and possible parameters. If you want to create dynamic ads, you need to sort out such parameters as content_ids or contents and content_type to specify the ID and product categories.
When you transfer data about offline purchases to Facebook, you have to create columns for the value of the price and currency in the data table.
![]()
In the case of eCommerce, we imply a variety of products with different price tags. It’s not worth establishing a statistical value for each item. Therefore, we are eager to show you how to set a dynamic value for the value parameter via Google Tag Manager.
How to set up sharing parameters via Google Tag Manager
Before the start, make sure that the basic work is done:
- standard Facebook Pixel code is installed.
- container Google Tag Manager is installed.
So, let’s get the ball rolling.
The minimum we need to send events to the system is the following construction.
![]()
- fbq indicates interaction with Facebook;
- track — the fact of sending the event;
- AddToCart is the name of a particular event.
We can already send this event to the system, but it still doesn’t have parameters. We can set the parameter in braces, specifying its name and value.
![]()
Value, currency, content_ids, and content_type are the names of the variables. Everything that comes after the colon is the value of these variables. As an example of the working code, it can be written like this:
![]()
We create this event in the console, then send it to the system by pressing Enter, and after that, check the name and value that we entered in Pixel Helper.
![]()
Since this is the example, the Facebook Helper extension throws an error message that the current id doesn’t match the feed, but in the actual configuration, there won’t be such an error. Now, this design needs to be transferred to Google Tag Manager.
Creating an event with a parameter in Google Tag Manager
- Create a new tag.
- Choose the type Custom HTML.
- Enter the event code with the parameter in the <script> </ script> container.
![]()
Now, you need to select a trigger for the tag.
As a trigger, you can set the page view, click a button, view the video, or more complex actions related to page scrolling.
To send the event after the addition of the goods to the cart, click Click All Element as a trigger.
![]()
In addition, you have to define the css selector of the ‘Add to Cart’ button and add it to the rules of our trigger. See below on how to determine the css selector:
![]()
Save the trigger, save the tag and update the container. You have added the event with the parameter.
There’s still the matter of how to use the dynamic variables that comply with our products instead of the static parameters that we set.
Creating a dynamic parameter for an event
We take the next page of the goods in the online store as an example.
![]()
It shows the product code, name, and price. All these values can be transferred to the system for each new product through dynamic parameters, but not manually.
First of all, you need to create a special variable that would contain the value of the price of the item.
- In the Variables section, create a new variable.
Choose the type DOM Element.
![]()
Furthermore, you need to take a code snippet directly on the site for creating a variable.
The next step is taking the value of the price of the goods. To do that, you need to select this value, then click Inspect / Check item. Thus, you’re able to see where the price is placed in the code.
In our case, this is the <span id = “priceblock_pospromoprice”> </ span> element.
![]()
Then right-click on this item and select Copy -> Copy selector. We insert this value as Selector to create a variable in GTM.
![]()
This is how the copied Selector looks like:
![]()
Selector indicates the location of the price in the product page code. You have to insert it into the ‘Element Selector’ field in the Google Tag Manager variable creation window, tentatively selecting the Selection Method ‘CSS Selector’.
![]()
Call this variable as ‘price’ and save it. Don’t forget to update the container.
![]()
Now, let’s check out how it works.
To do this, you have to update the page of the site and see which events work in Google Tag Manager.
You need an event DOM Ready. Open its variables and find dynamic price variable ‘price’. As you can see, the value is correct.
![]()
You can use this variable for dynamic substitution on each page with the goods.
With this in mind, let’s return to the previously created tag and instead of the static value, enter the name of the variable. In addition, you have to do the same thing for content_ids.
As a result, you get the following construction:
![]()
Save the tag. Update the container.
Now, let’s check how the updated tag works. Update the page of the site.
You can see that your tag works in Google Tag Manager.
![]()
You may test the event in Pixel Helper. As you see, the system receives a custom price parameter with a dynamic value of the goods cost.
![]()
Similarly, you’re able to create dynamic variables for ID values and product names.
We sorted out how to transfer parameters to Facebook Pixel events via Google Tag Manager. A practicing web analyst Andrew Osipov helped us with that. Andrew is a certified Google trainer, The Andrew Osipov’s web analytics school founder and the author of the blog “Web analytics and results.”
Adjusting pixel on other sites
How to set up a pixel on Tilda
There are two ways to integrate Facebook Pixel with the site: by pasting the code and pasting the pixel ID into the settings. ID can be copied on the main page (Overview) of the pixel. Then insert it in the site settings → Analytics → Facebook Pixel, save and republish the page.
In addition, pixel can be inserted as a code for the entire site or for a single page. To do this, click on the button “View installation instructions”, in the window that opens, select the method “Set the pixel code yourself manually” and copy the code from Step 2.
Next, go to Tilda Site Settings → More → Insert Code into Head. After inserting the code, click “Save” and republish all pages.
After that, you need to go back to Facebook and click “Finish.” Tilda will automatically start sending Lead and InitiateCheckout events to the Facebook pixel. To track the conversion of other events or actions on the site, you need to make additional changes to the integrated code.
How to set up a Vkontakte pixel
If you want the retargeting pixel to work on the VKontakte social network, you won’t be able to use the already created Facebook Pixel. You must create a special code directly in the VK ad manager.
To do this, select the “Advertising Campaigns – Retargeting” section, then open the “Pixels” tab and click the “Create Pixel” button.
In the window that opens, the pixel name, domain, data, and the site theme are indicated, after which the generated code must be copied and pasted onto the site between the head and /head tags. If your site is running CMS WordPress, you can use special plugins such as Head, Footer and Post Injection. In addition, a pixel can be added using the already known Google Tag Manager.
After a couple of minutes, check the status in the advertising account. If the work is done correctly, the system will report no errors and working code.
How to set up a pixel on Taplink
To install the Pixel on the Taplink page, you need to specify its ID in the Settings – “General” section and click on the “Save Changes” button. Specifying HTML code separately is optional, just a pixel ID is enough.
It’s worth remembering that you don’t need to configure events because Taplink is initially configured to send events to Facebook every time you click on links or instant messengers. Moreover, the system sends all the standard events for e-commerce, such as: “New application (lead)”, “Add To Cart”, “Start of ordering” and “Successful payment”. To check pixel, you can use the Facebook Pixel Helper.
How to Set up a Pixel on Instagram
For many, the question “is it possible to set a pixel on Instagram” remains relevant. But the answer is no. The platform does not give you the ability to install or remove anything. However, you can use the Pixel created in the Facebook ad account for retargeting, including Instagram. Users who were on your site can be “caught up” in both social networks.
It may happen that you need to provide third-party access to the Facebook pixel. To do this, you need:
- Declare the type of business relationship (with the recipient of their signals)
- Reaffirm acceptance of our Business Tools Terms of Service
- Get agreement from the business receiving a sharing request
To check the status of sharing requests, go to Business Settings> Data Sources> Pixels> Partners. After establishing a connection between you and another company, you will no longer have to repeat these steps to provide it with access to your information.
In addition, you can share the pixel with colleagues or team members. There are two ways to do this. A Business Manager admin can add them to the pixel, or to the ad account associated with the pixel.
To add users to the Facebook pixel, you need to open the Business Settings, in the “Data Sources” section click “Pixels”, select the one you need and click “Add People”, define the people and tasks that need to be assigned and click “Assign”.
How to remove pixel Facebook?
If for some reason you need to remove the pixel code from the site, this can be done in several ways:
– if the pixel was set manually, you can open the site code, find the header code in it and delete the pixel code that stands between the <header> and </header> tags.
– if the pixel was installed using the Google Tag Manager, then through the tag manager it needs to be removed. To do this, go into it, open Tags and remove unnecessary by clicking on the three dots in the upper right corner of the page.
– if the pixel was installed using third-party programs such as Wix or Squarespace, you can delete the code with their help. The official Facebook Help even has a detailed Guide.
![]()
Summary
Facebook Pixel provides advanced features for event tracking and more specific optimization of ad conversion. Most people understand its value, as well as how much Google Tag Manager helps in working with a pixel, however, few go deeper into the level of working with parameters. We often use parameters for events when working on clients’ projects, as this allows us not only to effectively achieve results but also to personalize our communication strategy as much as possible. The more detailed data we have, the more accurately we will get into the insights of our target audience. The parameters are responsible for all the details of the data.
Use the parameters in your work, ask your questions and do not forget to subscribe to our Messenger chatbot and Telegram channel so as not to miss our next materials!
If you have found a spelling error, please, notify us by selecting that text and pressing Ctrl+Enter.